AMP Research PowerStep Installation Guide & Instructions

AMP Research PowerStep Universal Electric Running Boards
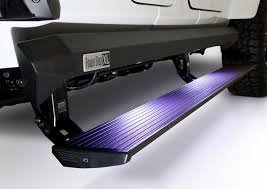
Premium electric running boards that automatically deploy when doors open and retract when closed. Features weather-sealed motors, LED lighting, and universal mounting brackets for most truck and SUV applications with reliable 12V operation.
AMP Research PowerStep Smart Series
Advanced smart running boards with smartphone app control and customizable settings. Includes wireless connectivity, programmable timing delays, and enhanced safety features with premium aluminum construction for superior durability and performance in all conditions.
Essential Tools and Preparation for AMP Research PowerStep Install
Before beginning your AMP research powerstep install, gather all necessary tools to ensure a smooth installation process. You’ll need a socket set with various sizes, drill bits, wire strippers, electrical tape, and a multimeter for testing connections.
Prepare your vehicle by parking on level ground and engaging the parking brake. Remove any existing running boards or side steps if present. Clean the mounting area thoroughly to ensure proper adhesion and fitment of brackets.
Read through the complete installation manual before starting your AMP research powerstep install. Identify all components in the kit and verify nothing is missing. Take photos of your vehicle’s current wiring setup for reference during the electrical connections phase.
Step-by-Step AMP Research PowerStep Install Process
Start your AMP research powerstep install by positioning the mounting brackets according to the template provided. Mark all drill holes carefully and double-check measurements before drilling. Use the appropriate drill bit size specified in your installation guide.
Mount the brackets securely using the provided hardware, ensuring proper torque specifications are met. The brackets must be level and properly aligned for smooth operation of your power steps throughout their service life.
Motor and Step Assembly Mounting
Attach the motor assembly to the mounted brackets, ensuring all connections are secure. The step platform should move freely without binding or interference from vehicle components. Test the mechanical operation before proceeding with electrical connections.
Route the wiring harness according to manufacturer specifications, keeping wires away from heat sources and moving parts. Use provided clips and ties to secure the harness properly during your AMP research powerstep install.
Electrical Wiring and Connection Guide
The electrical portion of your AMP research powerstep install requires careful attention to proper connections and wire routing. Locate the door trigger wires, typically found in the door jamb area or behind the kick panel.
Connect the positive and negative power leads to your vehicle’s electrical system, following the color-coded wiring diagram. Most installations require a connection to the battery positive terminal and a good ground point on the vehicle frame.
Door Trigger Wire Identification
Identify the door trigger wires using a multimeter to verify proper voltage readings. These wires should show 12V when doors are open and 0V when closed. Connect the trigger wires according to your specific vehicle’s configuration.
For vehicles with multiple doors, you may need to splice trigger wires together to ensure the PowerStep Smart Series responds to any door opening. Use proper electrical connectors and seal all connections against moisture during your AMP research powerstep install.
Testing and Calibration Procedures
Once your AMP research powerstep install is mechanically and electrically complete, begin testing procedures to verify proper operation. Start with a basic power test to ensure the motors receive electricity when doors are opened and closed.
Test each door individually to confirm proper trigger wire connections. The steps should deploy smoothly when any door opens and retract completely when all doors are closed. Listen for unusual noises that might indicate binding or misalignment.
Timing and Sensitivity Adjustments
Adjust the timing settings according to your preferences and vehicle requirements. Most units allow customization of deploy and retract delays to optimize operation for your specific needs during the AMP research powerstep install process.
Calibrate the system sensitivity to prevent false triggering from vibrations or electrical interference. If you encounter issues, consult the power step reset guide for troubleshooting procedures and system restoration.
Common Installation Challenges and Solutions
During your AMP research powerstep install, you may encounter clearance issues with exhaust components or frame obstacles. Use the provided spacers and alternative mounting points to achieve proper fitment without compromising functionality.
Wiring challenges often arise in vehicles with complex electrical systems or aftermarket modifications. Take time to properly identify trigger wires and test all connections before finalizing your installation to avoid operational problems.
Vehicle-Specific Considerations
Some vehicles require additional modifications or special procedures during the AMP research powerstep install. Lifted trucks may need extended brackets or modified mounting positions to maintain proper ground clearance and operation.
For vehicles with existing electrical modifications, ensure compatibility with your power step system. The 76151-01A PowerStep model includes specific instructions for challenging installations and provides additional mounting options for difficult applications.
Maintenance and Long-Term Care
After completing your AMP research powerstep install, establish a regular maintenance schedule to ensure optimal performance and longevity. Clean the steps regularly and inspect all mounting hardware for tightness and wear.
Lubricate moving parts according to manufacturer recommendations and check electrical connections periodically for corrosion or damage. Address any issues promptly to prevent more significant problems from developing over time.
Seasonal Maintenance Requirements
In harsh weather conditions, pay special attention to ice and debris buildup that can affect step operation. The weather seals and protective coatings applied during your AMP research powerstep install require periodic inspection and potential replacement.
For comprehensive maintenance procedures and schedules, refer to detailed power step maintenance guidelines that cover all aspects of long-term care. Regular attention to these details will maximize your investment and ensure years of reliable operation from your A-06 PowerStep system.
Completing Your AMP Research PowerStep Installation
Successfully completing an AMP research powerstep install requires careful planning, attention to detail, and patience throughout the process. By following the manufacturer’s instructions and taking time to properly prepare, test, and adjust your installation, you’ll enjoy years of reliable operation and enhanced vehicle accessibility.
The investment in quality electric running boards pays dividends in both convenience and vehicle value. Proper installation ensures optimal performance while protecting your investment through correct mounting and electrical connections. Regular maintenance following your AMP research powerstep install will maximize longevity and operational reliability.
Remember that professional installation remains an option if you encounter difficulties or prefer expert handling of your project. Many installers specialize in running board installations and can complete your AMP research powerstep install efficiently while providing warranty coverage on their work. Whether you choose DIY installation or professional service, AMP PowerSteps represent a significant upgrade to your vehicle’s functionality and appearance.
Take pride in completing this enhancement to your vehicle and enjoy the convenience and safety benefits that come with properly installed electric running boards. Your successful AMP research powerstep install will provide years of dependable service when properly maintained and operated according to manufacturer specifications.